Wednesday 27 March 2013

Talend Open Studio Integration with Teradata Database


Talend Open Studio is an ETL tool used for various databases. In this post we will see how Talend is integrated with Teradata Database. It contains basically three components.

  1.    Establishing the connection with Teradata
  2.    Data insertion in Teradata
  3.    Data extraction from Teradata


   Talend Open Studio Provides following options to integrate with Teradata database. These options are available in palette window inside Database options.


     We can use these options according to our need in the ETL process.
Now we will see how Integration of Teradata will be done

 1.        Establishing Connection with Teradata
       Before performing any operations through talend first we establish the
       connection to the database and check whether it’s working or not.


       In tTeradataConnection we need to give Host, database, user name,     password for connecting the database to Talend.


2.        Data Insertion in Teradata using Talend
When the connection is established then after that we can insert data in Teradata using tTerdataOutput.
This function inserts the input data flow to Teradata database.
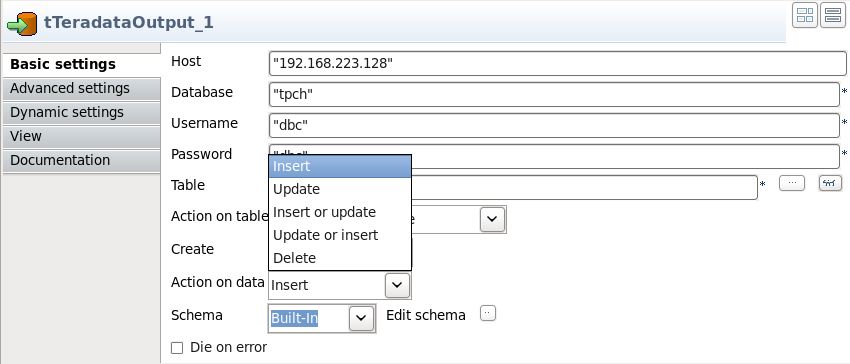


tTeradataOuput provides following options like Host name, Database name, Username, password, and the action you want to take on the data.

  1.     Action on Table : Action on table is defined for the action which will be taken on the table specified.


  1.      Action on Data : This is specified for the action you want to take on the data while inserting in the table.


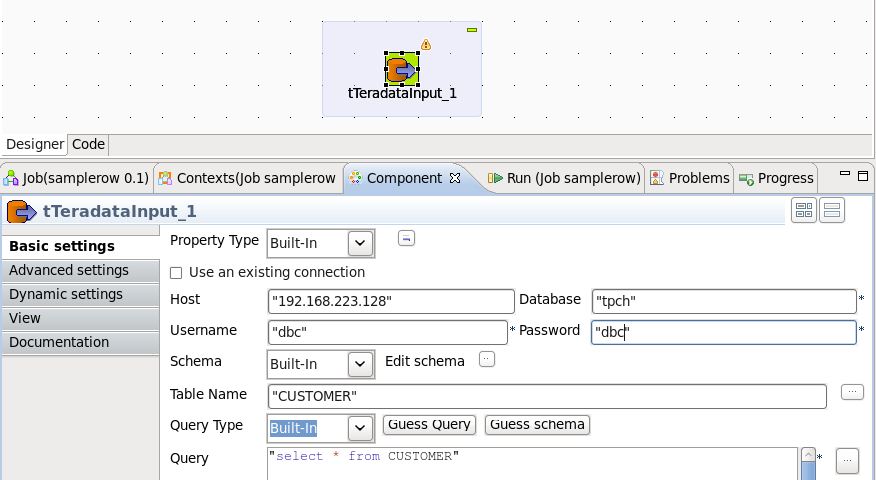
   3. Data Extraction from Teradata
For extracting the data from Teradata we use tTeradataInput function.On
the basis of given query it gives the result from the specified table.


Example scenario for Teradata and PostgreSQL ETL

In this example we are doing the ETL process between Teradata and PostgreSQL database extracting data from Teradata and dumping it to PostgreSQL.

1.    Setting properties of tTerdataInput.


By Browsing table option we can check the connection to the database is working or not. If the connection is established then it will show list of all the tables in database. 

2.    Setting the properties for tPostgresqlOutput.


3.    Run the scenario by pressing F6.


As you can see rows are extracted from Teradata and inserted in PostgreSQL


4. Output console

tLogRow will print all the input rows coming from Teradata to the Output console.


Thats all from my side contact me for any other queries related to Talend Integration.


Wednesday 13 March 2013

How to Increase the virtual box disk size of an existing linux virtual machine

Many people find difficulty in increasing size of existing virtual machine but trust me after reading this blog you will find it very easy. follow the steps as given below.

Initially Just make sure that your virtual machine is not running at the time you are making changes in that.

1. Right click on the virtual machine you want to increase the size and go to setting menu.

Settings Menu
2. Now go to Storage option where you can find the option to add new hard disk in the virtual machine.

Storage Option
3. Click on Add hard disk for creating the new storage disk.

Create disk option
here you can chose an preexisting disk also, I have created a new disk for extending the storage space of my virtual machine.

4. Choose the drive file type among the given options i have choosen *.vdi format for the hard drive.


Drive File Type
  4. Choose the Storage type on your physical hard drive, in most cases it is dynamically allocated.

Storage Type
5. Now choose the Size of your hard drive and you can also give a name to the hard drive.

Storage Size
6. Click on create and your hard disk will be created and you can see the one extra hard drive is created in your virtual machine.


As the Hard disk is created now the process is not completed you cant use that space directly in your machine you have to mount this drive in your desired directory.

Use following set of commands in the terminal of your linux machine to mount the created hard drive.

  • By Using fdisk command you can see all the existing partition of the disk in your system.
As you can see there is one new extended disk for which no valid partition exists so now first we need to make the partition for the new hard drive.


Now as the partition is created successfully now you need to make the file system by using mkfs command on the particular partition.


After creating the file system now you are ready to mount the disk on your desired directory .
I have mounted my drive on the data directory in the current folder you can choose according to your need.


That is all now you can see the mounted disk in your desired directory.

Thanks
Contact for any other queries.